Posted by Sam on Jan 27, 2012 at 06:01 AM UTC - 6 hrs
Most online developer API services that I've used are set up as if the customer is also the software developer.
That should change.
As the software developer, I don't want to be the owner of my customer's accounts, and I don't
want to worry about trying to figure out how to transfer ownership (if your service allows it, that is).
Because of that, theres a lot of waste that goes on: wastes of my time,
which wastes my customer's or my company's money.
I'm saying "customer" here, but you might substitute that with "the person who really needs / cares about the account,"
because that person, in my estimation, is rarely the software developer. Unless I'm developing an app for myself,
I only care about that API because someone else needs me to. And even when I'm developing for myself, I hope it gets to
a point where I need to hire someone to care about it on my behalf, so I can focus on more important things.
The typical signup process for me goes like this:
More...
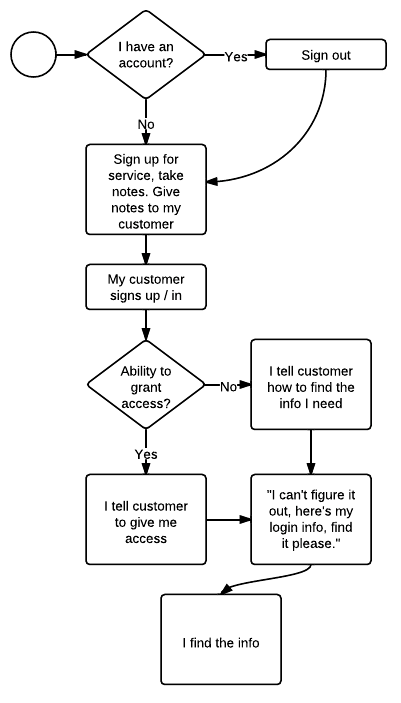
- Me: If I already have an account, sign out.
- Me: Sign up for the service. Find what I need to integrate with the API. Note the steps I perform.
- Customer: Signs up for the service, with me providing the steps they'll need to take.
- Me: Ask my customer to give me the info I need, or grant me access if that option is available.
- Customer: "I can't figure it out, here's my login info, find it please."
- Me: I find the info, and tell the customer to reset their password. I doubt they ever do.
You're offering the service, yet there's no "you" in that process.
Here's the process I'd like to see:
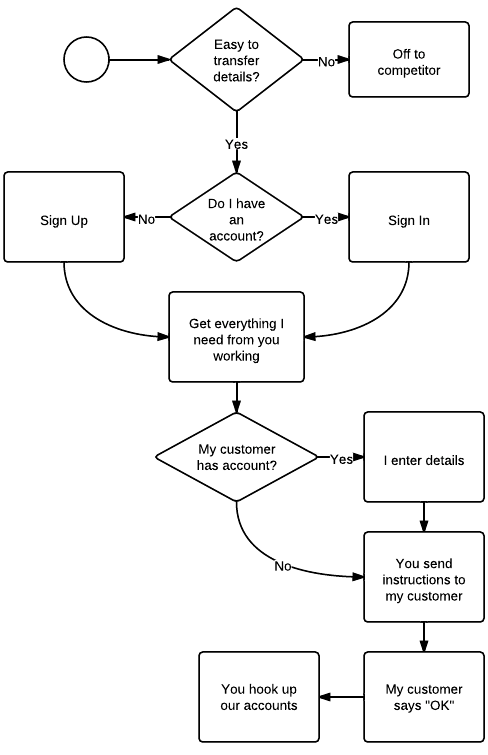
- You: Tell me I can easily transfer the account (or project or access keys) before I bother to sign up
- Me: Sign up for an account for myself.
- Me: Get everything working.
- Me and You: If I know my customer already has an account, provide a place for me to enter my customer's email address. If you offer more than one thing I'll need access to, let me indicate what I need for this project.
- You: Send detailed instructions of to grant access to my needs.
- You: If my customer does not have an account, you send them detailed instructions for how to sign up and what they'll need to know to get value from your service.
- Customer: signs up for their account, indicating they are actually working with me.
- You: Hook up our accounts, with me transferring ownership of that "project" to my customer.
There's a lot less of me and my customer in that process, and a lot more of you.
It's certainly more complex, but it's simpler for the people who matter: your users.
Remember, the software developer is often the one who makes recommendations as to which products to use. Make
it easier for me, and I'll be more likely to choose your service over a competing one.
post scriptum side note: I used Lucid Chart to do the flow charts. I really
like it, but given how rarely I've wanted to diagram online, I don't see myself becoming a paid
subscriber. What do you use?
Hey! Why don't you make your life easier and subscribe to the full post
or short blurb RSS feed? I'm so confident you'll love my smelly pasta plate
wisdom that I'm offering a no-strings-attached, lifetime money back guarantee!
Posted by Sam on Aug 01, 2011 at 08:12 AM UTC - 6 hrs
When you first introduce someone to source control, things often go smoothly until the first time they have to merge conflicting changes. Then they wonder,
What's the point of this? I thought it was supposed to be easy but it's a PITA.
Two responses on how to combat this immediately come to mind.
The first thing that can help in this situation is to ensure they aren't having to merge useless files. I'm thinking of files here like the CSS generated from SASS: they change frequently but the changes don't affect them one way or the other. (In this case, because the CSS will be regenerated). Another example is a user-specific project settings file.
Two strategies to avoid useless merging are to ignore files (do not have the repository track them) and to automatically use one version of a file or another. Each has it's place.
In the case of a file that needn't be in the repository to begin with -- things like Thumbs.db or .DS_Store -- you should obviously ignore them. In the cases where files
should be in the repository, but where you know which version you want all the time, you should consider telling it to always choose one file over another.
If you're using git,
.gitignore will help you ignore files, while
.gitattributes will help you choose one file over another without specifying it every time. I only wanted to make you aware of this, and Pro Git explains it better than I could, so I'll let you read about
how to do it over there.
Thanks to
Markus Prinz who helped me find .gitattributes when I didn't know the term I was looking for.
So what's the second thing that helps a newcomer to source control overcome their hatred of merging conflicting changes?
Remind them
the alternative is to consistently have their own work overwritten.
Posted by Sam on Jun 22, 2011 at 06:42 AM UTC - 6 hrs
Yesterday I got sick of typing
rake test and
rake db:migrate and being told
You have already activated rake 0.9.2, but your Gemfile requires rake 0.8.7. Consider using bundle exec.
I know you should always run
bundle exec, but my unconscious memory has not caught up with my conscious one on that aspect, so I always forget to run
rake under
bundle exec.
So
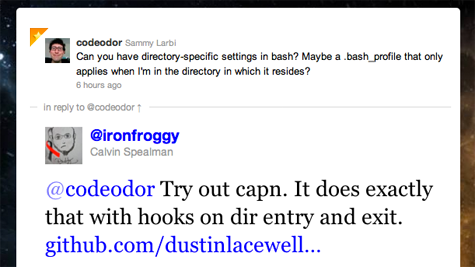
I wondered aloud on twitter if I could just alias
rake to
bundle exec rake, but confine that setting to specific directories (with bash being my shell).
Turns out, it is possible with the help of another tool that
Calvin Spealman pointed me towards:
capn.
More...
To successfully run the commands I've listed below, you need to have
python and
homebrew already installed. If you already have
libyaml installed or have another way of getting it, there's no need for homebrew.
The section beginning with the line that starts out with
echo and ending with
-unalias rake"... creates the capn config file. It's just YAML, so if you'd rather create it with a text editor, you can surely do so. See the
capn project for details on the config possibilities.
Either way, you'll want to change the paths I've used to the places
you want to do the aliasing.
From the terminal, run the following commands:
curl -O http://python-distribute.org/distribute_setup.py
sudo python distribute_setup.py
sudo easy_install pip
sudo brew install libyaml
sudo easy_install -U pyyaml
sudo pip install capn
echo "
settings:
default_type: path
hooks:
- path: ~/workspace #change this to the path where you want to alias rake
type: tree # if you don't want the whole tree under the path above, remove this line
enter:
- echo aliasing rake to 'bundle exec rake'
- alias rake='bundle exec rake'
exit:
- echo unaliasing rake from 'bundle exec rake'
- unalias rake" > ~/.capnhooks
source capn # put this line in your .bash_profile if you want capn to work when you enter the shell
# to deactivate the hooks, use: unhook
Enjoy the silence now that you don't have to hear the whining.
Posted by Sam on Jun 05, 2010 at 12:12 AM UTC - 6 hrs
I recently got the
EEE Box "Nettop PC" (Linux version) and was surprised to find
Red Flag Linux as the preinstalled flavor of choice.
My goal is to use it as a
wireless NAS, but keep it both expandable with external drives and available for use in
home automation.
source code for r-house available via github
More...
Skip to instructions
Back to the Linux EEE Box: I didn't expect to have a problem (neither with the OS nor changing it), but the "User' s Manual" came with instructions for Windows XP only. Booting to the Red Flag Linux distribution was a chore. I had to:
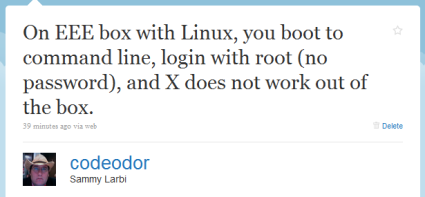
- Figure out that you login with username "root" and no password
- Thereupon be presented with the command prompt
- Find out which desktop environment it uses and try to start it, unsuccessfully
I knew the thing didn't have an optical drive, but I'm so accustomed to that process that I downloaded and burned an ISO of
lubuntu anyway. After some self-imposed hassle of locating a USB thumbdrive, I was able to install a bootable copy onto it. Then I plugged it into the EEE Box.
What happened?
 Art as Idea: Nothing, Joseph Kosuth, 1968 /Photo: NATIONAL GALLERY OF ART
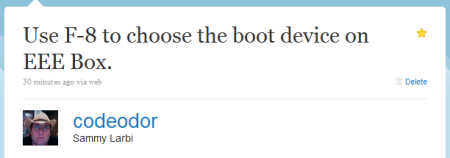
You'd have thought that plugging in the bootable USB drive would be enough. It didn't find it. I checked the BIOS, and it was set to use USB as the first boot device. I tried a few different configurations before stumbling on the epiphany that solved all of my problems:
Even though I had planned on starting with a fresh install of a *nix, I was stunned at how obscured it was, despite the fact that it turned out super-easy. Here are the steps I used:
- Download the Pen Drive Linux Universal USB-Installer (optionally download your distro of choice -- if not, it will allow you the option to do so)
- Use the installer above to put your linux distro on the USB stick
- Plug the USB stick into the EEE Box and (re)boot it, pressing F8 on the keyboard while it loads
- Select the USB bootup option that appears
- Install that version of Linux as you'd normally expect
Since it took me so long to find my answers, I'm hoping this helps you find yours. Let me know in the comments below.
Some links in this post are affiliate links!
Last modified on Jun 05, 2010 at 12:15 AM UTC - 6 hrs
Posted by Sam on Jan 15, 2008 at 07:31 AM UTC - 6 hrs
A quick note for people who get irritated when they forget to push
alt/option on the keyboard when they want to boot into another OS on their Macs:
rEFIt might be for you. It changes the boot-up sequence and pauses every time you boot to allow you to select which OS you want to use. It does other things as well, but I haven't used them yet.
Special thanks to
Grant, who introduced it to me this weekend before he left for Scotland. I think it's going to be a nice time-saver.